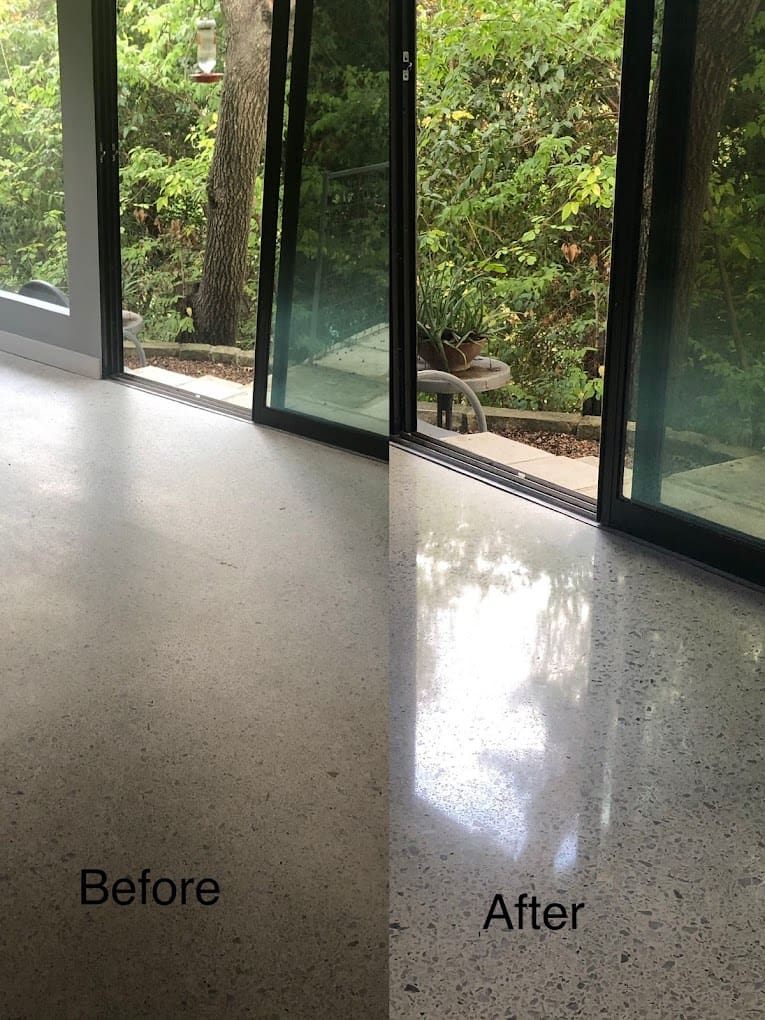
Santa Fe Floor Care

Santa-Fe-New-Logo

Grout Discoloration in Showers: Causes & Fixes

Grout discoloration, a common issue in showers, mars the pristine look of your bathroom over time. Factors like moisture, soap residue, hard water, and wear contribute to this problem.

Causes:

Moisture: Leads to mold, mildew, and weakened grout.

Soap and Shampoo Residue: Accumulates on grout lines.

Hard Water: Mineral deposits cloud grout.

Age and Wear: Regular usage wears down grout.

Solutions:

Routine Cleaning:

  • Use warm water and mild pH neutral cleaner.
  • Scrub gently and rinse thoroughly.

Grout Sealing:

  • Have your grout sealed every 1-2 years.

Deep Cleaning:

  • Use specialized cleaner or baking soda mixture cautiously.

Professional Cleaning:

  • Have your stone and tile pro do a deep cleaning when called for.

Grout Replacement:

  • DIY or hire professionals for extensive damage.

Prevention:

  • Wipe tiles and grout after each use.
  • Use a squeegee to prevent pooling water.
  • Maintain good bathroom ventilation.
  • Promptly replace old or damaged grout and caulk.

Conclusion:

Understanding causes and applying appropriate solutions can restore your shower’s grout. Regular maintenance and preventive measures ensure a clean and beautiful shower space.


By Fred Hueston. This article is one of a series of articles written and published on behalf of Surface Care PRO Partners.

Help! I Have Stiff Carpet

Help! I Have Stiff Carpet

We know when you first had your carpet installed, it was plush and soft. You enjoyed sitting and walking barefoot on it. Now however, it is stiff and possibly even crunchy in places. Nobody likes that. Let’s take a look at what causes stiff carpet and how to fix it.

What causes a soft carpet to become stiff and hard?

There are actually several reasons your carpet may become stiff:

  • Accumulation of dirt, residue, and debris – The buildup of dirt, debris, and residues within the carpet fibers can cause this problem. Over time, foot traffic, spills, and other contaminants can build up, creating a layer that stiffens the carpet. This accumulation can also attract more dirt, making the problem progressively worse.
  • Harsh chemicals – Harsh chemicals used to remove a spill or stain are harder to remove from the carpet and may leave behind a residue that holds onto dirt, creating the stiff carpet feel.
  • Stains – The presence of stubborn stains is another contributing factor to this issue. Spills and stains can leave behind residues that harden over time, making the affected areas feel stiff and crunchy.
  • Improper DIY cleaning methods – DIY carpet cleaners are not as powerful as professional cleaning equipment and can leave chemical residue behind that can stiffen your carpet.

The good news is, there is a fix for stiff carpet: A good, thorough deep- cleaning.

Is this a good DIY project?

Unfortunately, no, for this issue, DIY is not a good idea. These are just two of the reasons you should not DIY this project.

  • Professional equipment is much more powerful than DIY equipment and can remove much more of the dirt and cleaning agents that may be used in the cleaning process.
  • DIY equipment is not always properly maintained, not always through any fault of the company. Sometimes people return equipment that they misused or broke and don’t say anything, making it a problem for the next user, which could be you.

A thorough deep cleaning by a professional is the best answer to a stiff carpet problem. A stiff carpet can result from the accumulation of dirt, residues, and stains over time. Professional cleaning is designed to address these issues effectively. By deep cleaning the carpet fibers, removing stubborn stains, and using proper cleaning agents, professionals can bring back the softness and flexibility of your carpet, enhancing its overall look and feel.


By Sharon Koehler. This article is one of a series of articles written and published on behalf of Surface Care PRO Partners.

Why Is My Marble Turning Dark?

Is your light marble mysteriously turning dark? Read this article to learn why and what you can do to help protect it from certain damage that causes darkening.

Marble turning dark can be caused by multiple factors, and understanding these reasons is especially important for effective maintenance and preservation. Marble is a metamorphic rock composed primarily of calcite or dolomite crystals, and its natural beauty can be affected by both external and internal factors.

  • One common reason for marble darkening is surface staining. Spills of acidic substances, such as coffee, wine, or citrus juices, can etch the surface of marble, leading to discoloration.
  • Another cause is exposure to metal objects or water having high mineral content may cause rust or mineral deposits, darkening the marble’s appearance.
  • Another significant factor is the absorption of environmental contaminants. Marble is porous, meaning it can absorb liquids and gases. Air pollution, especially in urban environments, can deposit pollutants onto the surface of the marble, causing it to darken over time. This is particularly evident in outdoor installations where the marble is exposed to the elements.
  • Natural aging and weathering contribute to marble darkening. Sunlight exposure can lead to the breakdown of the stone’s minerals and alter its color. Over time, the surface may develop a patina, which in its own rite can be very beautiful.
  • Inappropriate cleaning methods can worsen the issue. Harsh chemicals or abrasive cleaners can damage the marble’s surface, making it more susceptible to staining and darkening. It is essential to use pH-neutral cleaners designated safe for stone surfaces to preserve the marble’s beautiful look.

Preventing marble darkening involves a combination of proactive measures. Sealing the marble surface helps reduce its porosity, making it less prone to staining. Regular cleaning with a gentle, stone-friendly cleaner removes surface contaminants. Avoiding contact with acidic substances and promptly addressing spills can also prevent discoloration.

The darkening of marble can be attributed to many factors, including staining, environmental pollutants, natural aging, and inappropriate cleaning methods. Understanding these reasons allows for the implementation of proper maintenance practices to preserve the beauty of marble surfaces over time.


By Sharon Koehler. This article is one of a series of articles written and published on behalf of Surface Care PRO Partners.

Pet Stains on Carpet

We love our pets, dogs, cats, ferrets, birds, etc. They bring us laughter and joy. They console us when we are sad and stay by our sides when we are sick. Unfortunately, they can’t talk to us and tell us what they need. So, sometimes, accidents occur.

Pet urine stains and odors on carpets can be a common challenge for pet owners. Whether you have a new puppy still in the process of house training or an older pet with occasional accidents, it’s essential to address urine stains promptly to prevent long-term damage and lingering smells.

One of the primary concerns with pet urine is that it can seep into the carpet fibers and, if not properly treated, can lead to permanent staining and unpleasant odors. Here are some effective steps to tackle pet urine stains and smells on carpets:

  1. Act Quickly: The sooner you address a pet urine accident, the better. Blot the urine with paper towels or a clean cloth to absorb as much liquid as possible. Avoid rubbing the stain, as it can push the urine deeper into the carpet.
  2. Apply the Cleaning Solution: Enzymatic pet stain cleaners are excellent for pet stains and odors. These cleaners contain bacteria and enzymes that break down the components of urine, effectively eliminating both stains and odors.
  3. Finish with Baking Soda: Once the area is mostly dry, sprinkle baking soda over the stain. Baking soda not only helps absorb remaining moisture but also neutralizes odors. Leave it on the carpet for several hours or overnight.
  4. Vacuum the Area: After the baking soda has had time to work its magic, vacuum the treated area thoroughly. This will help remove the baking soda along with any remaining odor.
  5. Professional Cleaning: For stubborn stains or persistent odors, professional carpet cleaning services may be necessary. Professional cleaners have the expertise and equipment to deep clean carpets and remove tough stains.
  6. Preventive Measures: To avoid future incidents, make sure your pet has regular bathroom breaks and is properly trained. Use pet-friendly deterrent sprays to discourage repeat accidents in specific areas.

Dealing with pet urine stains and odors on carpets requires quick action and the right cleaning techniques. By following these steps and maintaining preventive measures, you can keep your carpets clean and free from the lingering effects of pet accidents. For more information, see our Carpet Care Guide.


By Sharon Koehler. This article is one of a series of articles written and published on behalf of Surface Care PRO Partners.

Protecting Your Stone Surfaces

You invest a lot of time and money in your surfaces. Countertops, floors, tabletops, and other stone surfaces can enhance a home or business quite a bit. To keep your stone surfaces looking beautiful, there are certain things you can do to help them stay in pristine condition.

  1. Prevention is Key: Start by setting some ground rules for your guests. Encourage the use of coasters for beverages and ask them to avoid placing hot pots or pans directly onto stone countertops. Remind everyone to be mindful of sharp objects that could scratch or chip the surface.
  2. Clean Regularly: Regular cleaning is crucial to keeping the beauty of your stone surfaces. However, avoid using harsh chemicals or abrasive cleaners that could damage the stone. Instead, opt for pH-neutral, stone-safe cleaners. Wipe up spills promptly to prevent staining and etching, especially from acidic substances like wine or citrus juices.
  3. Use Trivets and Coasters: Invest in high-quality trivets and coasters to protect your stone surfaces from hot dishes and drink condensation. Place trivets under hot pots and pans to prevent thermal shock, which can occur when extreme temperature changes affect the stone’s structure.
  4. Seal the Stone: Depending on the type of stone, it may benefit from periodic sealing. Sealing creates a protective barrier that repels liquids and reduces the risk of staining. If you are unsure if the stone needs to be resealed, perform the water drop test. Just put a few drops of water on the surface in a few different places. If the water soaks in, then it needs resealing. If your stone surface does need to be resealed, call your stone care professional before potentially damaging spills occur.
  5. Use Cutting Boards: When preparing meals, always use cutting boards to protect your stone countertops from scratches and dings caused by sharp knives. This simple habit can significantly extend the life of your stone surfaces.
  6. Be Mindful of Heavy Items: Avoid placing excessively heavy or sharp objects directly onto your stone surfaces. Use felt or rubber pads under decorative items, vases, or other heavy objects to prevent scratches and dents.
  7. Wipe up Spills Immediately: Accidents happen, but prompt action can prevent lasting damage. If a spill occurs, blot it at once with a clean, soft cloth. For stubborn stains, use a poultice or a specialized stone stain remover.
  8. Manage Traffic: Stone floors can bear the brunt of foot traffic. Place doormats at entrances to trap dirt and debris, preventing scratches from shoes. Encourage guests to remove their shoes or supply soft slippers to minimize potential damage.
  9. Consult a Professional: If you’re unsure about the care of your specific stone, consult your stone care professional. Stone experts can provide personalized advice based on the type of stone you have and its unique characteristics.

For routine care and maintenance tips, please feel free to consult our Stone and Tile Care Guide on our website.

By taking these precautions, you can use your surfaces for years to come, without compromising the beauty and longevity of your cherished stone surfaces. With a little care and attention, your stone countertops, floors, and tabletops will continue to show their true beauty for a long, long time.


By Sharon Koehler. This article is one of a series of articles written and published on behalf of Surface Care PRO Partners.

Routine Maintenance for Travertine Showers – 7 Tips

We received a question recently asking for tips for maintaining a travertine shower.

Q: Hello! I am wondering if you could give tips on the best daily/weekly maintenance of a newly sealed travertine shower?  The best way to keep soap scum, and oils from building up?

A: Great question! To keep soap scum and oils from building up, and keep your travertine shower looking great, here are 7 tips and suggestions:

1. Regular Cleaning:

Wipe down your shower surfaces after each use with a squeegee or a microfiber cloth to prevent water spots and soap residue from drying on the travertine. Keep a squeegee in the shower for convenience.

2. Use a Mild Cleaning Solution:

Use a pH-neutral stone cleaner or a mixture of warm water and a few drops of dish soap to clean your travertine. Avoid acidic or abrasive cleaners that can damage the sealant.

3. Avoid Harsh Scrubbing:

Gentle scrubbing with a soft brush or cloth is sufficient. Avoid using abrasive scrubbers or pads that can scratch the surface.

4. Rinse Thoroughly:

After cleaning, make sure to rinse the shower thoroughly with clean water to remove any residue.

5. Preventive Measures:

Consider using a shower caddy to keep shampoo bottles and soap off the shower floor. This can help reduce soap scum buildup.

6. Ventilation:

Ensure proper ventilation in your bathroom to reduce humidity, as high humidity can promote mold and mildew growth. Keeping the shower door open a bit when not in use helps.

7. Sealant Maintenance:

Have your shower walls re-sealed as needed to maintain the protective barrier. This helps prevent oils and water from penetrating the stone. Why do we say shower walls? We don’t recommend sealing the shower floor. Here’s why:

Why Sealing a Shower FLOOR is Not Recommended

When it comes to maintaining your stone shower, conventional wisdom might suggest that sealing both the walls and floor is the best way to protect the stone from water damage and staining. However, this is not entirely true, especially for the shower floor. While sealing the walls of a stone shower can be beneficial, sealing the floor can lead to unforeseen problems, primarily due to trapped moisture.

Stone is Naturally Porous

Stone, a natural and porous material, is often chosen for shower floors due to its aesthetic appeal and durability. These pores, while microscopic, are essential for the stone to ‘breathe’, allowing moisture to evaporate naturally. When you seal a stone shower floor, you effectively trap moisture beneath the surface. This is particularly problematic in a high-moisture environment like a shower. Unlike walls, which have time to dry out and are not constantly underfoot, the floor is regularly exposed to water and pressure.

Discoloration and Damage

Moisture entrapment creates an ideal environment for mold and mildew to thrive. These not only pose a health risk but can also cause a musty odor and further discolor the stone. Trapped moisture can lead to discoloration, a common issue with sealed stone floors. In extreme cases, the trapped moisture can also weaken the stone, leading to cracking and chipping.

In Conclusion

By following these tips, you should be able to keep your travertine shower looking its best. If you have any more questions or need further advice, feel free to reach out to us.


By Fred Hueston. This article is one of a series of articles written and published on behalf of Surface Care PRO Partners.

Protecting Your Carpet

Protecting your carpet throughout the year is essential to ensure it remains clean and pristine despite increased foot traffic, holiday decorations, pets, weather, and potential spills that happen as the year passes. Birthday parties, graduations, monsoon weather events, wet, dirty pets and various other events can have a damaging effect on your carpet. Here are various tips to safeguard your carpet and maintain its quality throughout the year.

  • Strategic Rug Placement: Utilize rugs or runners in high-traffic areas to act as a protective layer for your carpet. Placing rugs in entryways, hallways, and areas prone to heavy use can prevent direct contact with shoes and potential stains.
  • Shoe-Free Home Policy: Implement a shoe-free policy to minimize the amount of dirt, moisture, and debris tracked onto your carpet. Provide a designated area for shoes near the entrance to encourage guests to remove their footwear.
  • Regular Vacuuming: Increase the frequency of vacuuming prior to and during  gatherings and other events to remove dirt, crumbs, and other debris. Regular vacuuming helps prevent these particles from embedding deep into the carpet fibers.
  • Immediate Stain Treatment: Accidents happen, especially during gatherings and events. Have a stain removal plan in place and address spills immediately. Blot stains with a clean cloth or paper towel without rubbing, as rubbing can push the stain further into the carpet.
  • Protective Furniture Pads: Place felt or plastic pads under furniture legs to prevent them from damaging or crushing the carpet fibers. This will also make it easier to move furniture when rearranging rooms for seating and/or decorating.
  • Cautious Decoration Installation: Be careful when installing event or holiday decorations to avoid causing damage to the carpet. Utilize non-damaging methods like hooks or clips that won’t tear or pull at the carpet fibers.
  • Limit Food and Drink in Carpeted Areas: To prevent accidental spills, establish designated eating areas away from carpeted spaces. Use trays or tablecloths to contain crumbs and spills, minimizing the risk of them reaching the carpet.
  • Regular Professional Cleaning: Consider scheduling a professional carpet cleaning before and after any planned gathering. This deep cleaning can remove embedded dirt, stains, and refresh the carpet’s appearance.
  • Pet Precautions: If you have pets, be mindful of their presence and the potential for accidents. Keep pet-specific stain removers readily available to tackle any accidents promptly. Refer to immediate stain treatment if they track in any mud or debris.
  • Preventative Measures: Consider applying carpet protectants or sealants, which can create a barrier against stains and make cleaning up spills easier.
  • Inform Guests: Make your guests aware of your carpet care guidelines, especially if you have specific instructions regarding shoes, food and drink areas, or any other precautions they should take.

By implementing these measures, you can significantly reduce the wear and tear on your carpet during the events of the year. Proper care and maintenance will help preserve your carpet’s quality and appearance, ensuring it remains a beautiful and inviting part of your home, even during the busiest times that life brings.


By Sharon Koehler. This article is one of a series of articles written and published on behalf of Surface Care PRO Partners.

10 Holiday Survival Tips For Floors & Decor

Every year after the holidays are over, without fail we get the same frantic calls about the damage done on carpet, upholstery, stone, and hardwood. These suggestions and tips will go a long way in helping you to avoid these common mishaps, and let you know what to do if they happen.

The holidays are a time for relaxation and fun, but they can also wreak havoc on your beautiful floors and surfaces. Stay focused on the good times this holiday season while taking some common sense precautions! The things you treasure will thank you for it. Here are some holiday-related tips that you should follow to keep your floors and decor looking great:

Tip #1: Place a tray under open wine, champagne, and liquor bottles on your stone countertops.

A charcuterie board is a great option and it can be fun to decorate underneath and on it! Let the tray keep the spills off your stone to preserve its beauty. If spills do occur clean them up as quickly as possible.

This simple ounce of prevention will go a long way to prevent damage. Some spills on stone counters can result in stains and etch marks. Etching is actually damage on the surface of the stone caused by acidic spills, and won’t be able to be removed with just cleaning. (Note —vinegar is NEVER a good cleaner for stone because it will etch the surface! And etching will need a professional to fix it. So just avoid vinegar altogether!)

Tip #2: Avoid Common Christmas Tree Mishaps.

Bringing the tree in and out. Needles on Christmas trees are abrasive and can scratch your marble or hardwood floor finish, so don’t drag trees across them. Needles on carpet can be a nuisance as well. When they drop they easily get ensnarled in the carpet. Sap from the tree can be a problem also.

To move the tree in and out put a protective paper, tarp, or blanket down (something padded is probably better). And off-weight it a bit so the weight of the tree is not dead on the floor surface.

By having something between the tree and your floor you avoid potential scratching and lessen the chances of dealing with a big mess of fallen needles and sap.

The clean up will be simplified, resulting in less vacuuming and less chance for sap to cause you problems in the future.

Be careful when watering. Overwatering can damage carpet, hardwood, and even LVP. Minerals from plant water can stain carpets or leave a dark mark on hardwood floors.

Regarding the water in the tree stand, make sure the stand (which has water in it) doesn’t leak. Then, be careful when filling it, don’t overfill the stand. (It’s a good idea to get one of the extended funnels for watering, the one you place in the back of the tree, and leave it there. Hide it. These handy funnels make watering the tree a whole lot easier than bending over to water it. Bending down, working around the lower brances, the tree skirt, packages or even the train set might be akward and increase the chances of spilling water on the floor.

Tip #3: Don't Set Your Train Set Directly on the Carpet.

Make sure the trains under the tree sit on the tree skirt and not directly on the carpet. The graphite can transfer from the train track onto the carpet, and may or may not come out. Just ask our good client and friend Dave G. about the fallout that happens if you don’t! 

Dave and his wife had a picture book Christmas tree. All decorated near the fireplace, with the tree adorned with ornaments, and the trains appropriately set up, it was Christmas festive. However, the trains sat directly on their white carpet. 

With the holidays over they got the tree down and the trains packed up. But in doing so they discovered a gray tinge of discoloration under the entire train track. Quickly calling us we arrived and explained that the graphite (like bike grease), is not a good thing to let get on the white carpet. Being an oily-based contaminant it may have become a permanent stain left behind. So using our solvents (don’t do this yourself, you could damage your carpet even worse) we gently dabbed the graphite off. In the end, we advised Dave to simply place a tree skirt under the track to keep that from happening again!

Tip #4: Prevent Candle Wax From Dripping Onto Your Surfaces.

Menorah Candles. As children and families gather with excitement to light the candles, be careful the wax doesn’t drip onto things like tablecloths, carpets, counters, or other stone surfaces.

Although Menorah candles are traditionally not laden with dyes, the oils in the wax that drip on the surface can still absorb and leave a stain. Candles with dyes can make it even worse.

But if you do get a wax spill, here’s what to do:

Melted Wax on Textiles: When candle wax drips onto fiber and fabric it is best to let it solidify and harden. Once that has happened you can carefully remove the wax in chunks (but be careful not to scrape or rub it too hard). Once that is done you can “iron transfer” the rest of the wax onto a thin white rag. For this white tee shirt material is good to use. Place the rag on the wax spot watching closely. Use a hot iron and check it regularly. Don’t scorch it! (Steam mist is good to use for this too.) As the spot is gently heated the wax will migrate to the tee shirt or rag, and out of the carpet or fiber. But again, be careful not to burn it!

Once that is done check for a residual oil ring. To remove that you can try to remove it using a good carpet spotter. This is a good tip, but depending on how ‘oil-loving’ the fabric is you may or may not completely remove the stain. (This means, you may need to call us for professional treatment, to increase the chance of getting it removed.)

Melted Wax on Stone: If you have melted candle wax on stone, refer to our Stain App (under our Caring For It section on the menu) for instructions to remove the wax and any resulting stains.

Tip #5: Adopt a Shoes-off Policy.

Your carpets, hardwood, stone, and floors will love you for it!

High heels on hardwood floors can be brutal. Stiletto and high heels can do thousands of dollars of damage, sometimes in a mere few hours. Not all hardwood floors can withstand the impact of a woman in heels. I saw an $8000 beautiful (soft) hardwood floor ruined by 6 ladies in high heels in about 4 hours time several holidays ago!

The new owner was heartbroken! An OCD kinda guy, he bought a builder’s personally designed custom home, with the pine floors as the showcase. After a New Year’s party, in just 4 hours time he learned the very hard lesson that high heels can damage some hardwood floors in nothing flat! It was a shame and a lasting reminder of a costly mistake learned by a gracious host during a festive gathering. In hindsight, an easy preventative measure would have been if he gently asked everyone to remove their shoes! 

And I am certain there was an $8k ‘learning curve’ price tag attached to it!

Snow and salt. Ice and snow leave puddles on your hardwood floors, and if left the water and salt minerals can damage your finish. Clean water and puddles up as soon as they happen.

Salt particles are abrasive when walked across the floor, as is other snow melt, or even cat litter. They can all damage hardwood floor finishes, stone, or even LVP.  And their grittiness grinds away when it embeds in carpet.

Taking off your shoes at any entryway is just a good practice. Or, at least kicking the snow and salt off of your shoes before you enter is a good way to prevent these particles from being dragged into the interior floor surfaces.

If you decide on a no-shoes policy create an area for outdoor shoes that is a subtle hint for folks to remove them. Lined-up boots by the door or even bins are a good suggestion (and hint). You may be surprised how cooperative your guests will be! to prevent any snow from melting onto the floor.  

Adopt this practice which is common in the ‘high country’ or ‘north country’. Or follow suit with some cultures who don’t wear indoor shoes. To them, it’s also a matter of respect!

Tip #6: Glitter and Gift Wrap

All that glitters is not gold! And neither is pretty paper!

Little unknown fact, until you discover it the wrong way, glitter and pretty wrapping paper can bleed on to surfaces if they get wet. 

The dyes, just like bleeding clothing in the washer, if allowed to get wet can bleed into your flooring and fabrics. Especially vulnerable are carpets, upholstered fabrics, and softer stone surfaces like marble. 

Unsuspectingly, bleeding of paper and glitter easily can occur if wet shoes or boots walk across the floor surfaces close to where the water can leach onto the paper and glitter. You could be asking for trouble. Puddles from boots left unattended near wrapped packages are a common culprit, perhaps near a foyer tree or menorah display. 

Or it can happen as wet shoes make the floor surface wet that glitter falls on. Glitter will bleed as well. Finally, glitter or wrapping allowed to sit on upholstered fabrics or leather can do the same thing. The dyes will bleed into these surfaces too, and may well become a problem stain on them.

So be careful, watch for puddles, wet carpets and surfaces overall. And regarding shoes and boots, because they can cause damage to carpets and absorbent floors, it’s another good reason for a shoes-off policy!

And in the case you do get stains, the sooner you treat them, the better.  Our Stain App for Stone and Other Hard Porous Surfaces gives step-by-step instructions for treating stains from dyes on stone.

Tip # 7: Clean up spills on carpet and fabric quickly. Be prepared and have a quality spotter on hand. 

Let’s face it. Spills are going to happen!

When you do have a spill, blot but don’t rub it. Blot to absorb the liquid. If it’s red wine, treat the spill with a good spotter, but in a pinch white wine to dab the spot can help. As you do, blot with a clean, dry area of the rag to absorb the red dye into the rag, paper towel, etc.

Hot chocolate, coffee, and tea can also stain. It’s heartwarming to enjoy coffee or hot chocolate but they have red dyes in them, and are very good at staining fiber and fabrics. Tannin in teas also stains easily, and the hotter any of them are the better the chance for stains to be permanently set into the textiles you treasure and love.

Tip #8: Avoid SMOKE Damage. Make sure your chimney flue is open.

Let’s hope it’s only Santa coming down the chimney and not smoke from your fire.

Before you roast the chestnuts on the open fire make sure your fireplace flue is open. Besides the obvious of having smoke back up into your house and ruin your festive gathering, you can also cause heavy soot damage. Besides soiling your fireplace you run the risk of having soot damage affect your interior structure, your contents and beautiful things! 

If you do have soot damage you will more than likely need professional cleaning to remove it.

Tip #9: Make Your Baths and Showers Guest-Ready While Minimizing Potential Damage.

Overnight guests using your shower? Spritzing on neutral cleaner after everyone has showered for the day, then wiping the walls with a squeegee will keep your showers clean without a lot of work. Also, keep the shower doors open a bit to allow for drying will go a long way in preventing mold and mildew. 

Place vanity trays for your stay-over guests to place their perfumes and cosmetics on. 

This will help avoid etching and stains.   

Place a pretty stack of individual paper hand towels on the sink to for drying (some come in a tray, or you can get one specifically for them). There are always Christmas, holiday, seasonal or monogrammed themed towels to be festive.  

And plan to occasionally disinfect bathroom touchpoints, such as handles and knobs. Knowing all too well the reasons why, it is a courtesy to your guests and peace of mind for you to minimize the sharing of germs during the holiday gatherings.

Tip #10: Mitigate Over-indulgence

Vomit, urine accidents, or worse.

As they say, too much of a good thing can come back to bite you. Be it pet or human, overindulging can have damaging consequences. Be it from too much candy, cookies, cheer, or just excitement these accidents can happen. When your home experiences one of these mishaps a quick clean up is important. Make sure to blot the “content” up as much as possible into paper towels, napkins, a white rag or a towel. Don’t let it sit. And do not rub back and forth (you may permanently distort the carpet or fabric). 

For mishaps on stone, hardwood, or even carpet, you could make a poultice with pure table salt and pour it over the spill. Be generous and coat the area, and let it sit. The salt will draw the contaminants out of the surface and into the salt coating (just like an Epsom salts bath does).

Actually, the best piece of advice is to keep the area damp, not soaked. Perhaps wet some white towels, squeeze some mild temperature water back into the spot (not a lot). Cover it with an unused plastic trash liner. Unfold it and cover the affected area. Avoid foot traffic on the affected area. And plan on calling a professional (especially if there is runny or dark matter).  

We have specific cleaning solutions, for instance, enzymes that are formulated just for these problem spills. Along with special wands and hand tools, and professional experience, we increase the chances of removing them before they stain. Time is of the essence here! So it is best to leave it alone with the aforementioned instructions, and don’t wait, call the next day. It’s a fragile time that quickly converts to a lost chance, so the sooner you call the better!  

While you are enjoying the holiday cheer, just know that your friendly floor and surface care pros are only a call away, and will certainly come for mimosas or ‘Bloodies’ (just kidding!)  Call us at (512) 632-1621 or CONTACT US online. 

From Earth to Elegance: What Makes Marble Colors?

Have you ever gazed upon your marble, adorned with its array of exquisite colors—some vivid and striking, while others exude a more refined and graceful allure—and pondered the origins of these beautiful hues? After learning how these colors are formed, you’ll never look at your marble quite the same.

Marble is a metamorphic rock that forms from limestone through the process of metamorphism. (Alteration of rock by heat, pressure, or other natural occurrences). During this transformation, a range of factors influence the coloration of marble, giving rise to the stunning array of colors and patterns that make each marble type unique. The main factors that contribute to the colors of marble are mineral composition, impurities, and geological processes. Let’s explore each of these aspects in detail:

Mineral Composition

Marble is primarily composed of calcite or dolomite minerals, which are both forms of calcium carbonate. (Calcium carbonate is a combination of carbon, oxygen, and calcium and is a common mineral found throughout the world.) The crystal structure of these minerals allows them to interact with light in different ways, influencing the perceived color of the marble. The presence of other minerals and impurities further enhances these color variations.

Impurities

Impurities are foreign substances that find their way into the marble during the metamorphic process. These impurities play a significant role in determining the color and patterns exhibited by the marble. Some common impurities found in marble include:

Iron Oxides

Iron impurities can give marble various shades of red, brown, yellow, and orange. Hematite creates reds and yellows, while limonite produces browns and yellows.

Graphite

The presence of graphite can lend a gray or black color to the marble.

Clay Minerals

Clay minerals introduce earthy tones such as beige, tan, or brown to the marble.

Serpentine

Serpentine impurities create green marble, such as the famous Verde Antique marble.

Sulfides and Organic Materials

These can lead to black or dark veining in the marble.

Geological Processes

The geological history of the region where the marble forms can also influence its color. The presence of specific minerals or the type of rock that undergoes metamorphism alongside the limestone can contribute to the unique colors and patterns. Additionally, the intensity of heat and pressure during metamorphism will impact the recrystallization of minerals and the formation of specific colors.

Local Geography and Environment

Different regions around the world are known for their distinct marble colors and patterns due to variations in the local geology and environment. For example, Carrara marble from Italy is famous for its white color and has been used in many famous sculptures and buildings. The Danby marble from Vermont, USA, is prized for its pure white color and minimal veining.

Age and Degree of Metamorphism

The duration and intensity of the metamorphic process can influence the colors of marble. Marble that undergoes extensive metamorphism over prolonged periods may have a more uniform color, while marble that experiences variable conditions may show a greater variety of colors and patterns.

The mesmerizing colors of marble result from a complex interplay of mineral composition, impurities, geological processes, and the specific environmental conditions where the metamorphism takes place. This diversity in colors is what makes marble such a sought-after and cherished material for various commercial, residential, and artistic applications.


By Fred Hueston. This article is one of a series of articles written and published on behalf of Surface Care PRO Partners.

About Natural Fiber Hemp Rugs

From time to time we are asked if we clean hemp rugs, or our customers will ask our opinion of hemp rugs vs other, more traditional types of natural fiber material. Do they hold up well? Are they easily maintained? Are they eco-friendly… etc. Here’s our take on hemp rugs…

Yes, we do clean all types of rugs, including hemp. Here is a little insight into hemp rugs, vs other more traditional types of fibers: Most of the time, when people think about natural fiber rugs, they think about wool or cotton. Maybe even sisal or jute, but very seldom do we think about hemp as a natural fiber rug. However, as it turns out, hemp can be and is made into rugs.

The biggest problem hemp has is people’s assumptions that hemp plants and Cannabis (aka marijuana plants) are one and the same, but they aren’t. What they are is 2 different varieties of the same plant species. (Like a housecat and a tiger or a Great Dane and a Dachshund).

There are several real differences between the plants themselves:

  • Hemp – Tall sturdy stalks with little to no flowering buds.
  • Cannabis – Shorter, bushier plants with an abundance of flowering buds.
  • Hemp – Very low THC content (.03% or less).
  • Cannabis – Higher THC content (can be upwards of 30%).
  • Hemp – Hemp has many commercial uses such as rope, paper, fabric, and biofuels.
  • Cannabis – Grown strictly for medicinal and recreational reasons.

As noted, hemp has many commercial and industrial uses, one of which is rugs. Like other natural fiber rugs, they have their good and bad points:

Pros of hemp rugs:

  • Durability – Hemp fibers are known for their durability, making hemp rugs robust and long-lasting. They can withstand high traffic areas without wearing out quickly, making them a great choice for homes or offices.
  • Hypoallergenic – Hemp rugs are hypoallergenic, making them an excellent option for individuals sensitive to allergens. They do not trap dust or harbor allergens like some other materials, enhancing indoor air quality.
  • Environment Friendly – Hemp is a highly sustainable material. It requires minimal water, no pesticides, and grows quickly, making it an eco-friendly choice for rugs. Its cultivation helps to improve soil health and can be part of a regenerative agricultural cycle.


Cons of hemp rugs:

  • Color – Hemp fibers may have natural color variations due to the plant’s organic composition. While this can add a unique aesthetic, it might not suit those seeking a uniform color or pattern.
  • Texture – While durable, hemp rugs can be rough to the touch, especially when compared to softer materials like wool or cotton. Some people might find the texture less comfortable, particularly for sitting or walking barefoot.
  • Shedding – Hemp, like some other natural fiber rug material is prone to shedding. Regular vacuuming can help keep this under control.

Hemp has found its way into various industries, including the creation of durable, eco-friendly rugs. While hemp rugs offer durability and sustainability, they might not suit everyone due to their texture, shedding, and natural variations. Understanding these pros and cons can assist in making an informed decision when considering hemp rugs for your living or working space.


By Sharon Koehler. This is one of a series of articles written and published on behalf of Surface Care PRO Partners.